Training Page for Segmentation
The training page on Qualviz.ai is designed to help users configure, monitor, and optimize their machine learning models. Below is a detailed guide to its functionalities.
Training Your Model
After completing the annotation process, you’ll proceed to the training page to set up your model for training.
Setting Up Training

Choose Training Options:
- Enter Model Name: Type a name to save and recognize your model easily.
Training Time: Specify the duration of the training process.
- Options: “Very Low”, "Low", "High", "Very High"
Choose Model Speed: Adjust the speed to balance performance and time.
- Basic → 768
Good → 512
High → 384
Very High → 256
- Basic → 768
Generate Images for Training:
- Artificially expands the training dataset with augmentations.
- Regenerate: Preview new image augmentations.
- Set to Default: Use default augmentation settings.
Below are the adjustable options:
- Epochs: One full training cycle through the dataset.
- Translation Offset: Shifts the image in X/Y directions.
- Max Rotations: Rotates the image randomly within a range.
- Scale Range: Random scale applied between set bounds.
- Random Horizontal Flip: Flips the image horizontally.
- Random Vertical Flip: Flips the image vertically.
- Random Blur: Applies blur from scale 3–7.
- Random Noise: Adds noise to simulate data variability.
- Brightness: Adjusts light intensity using value range.
- Contrast: Adjusts light-dark difference in image.
- Saturation: Controls how vivid or dull colors are.
- Hue: Slightly alters color tones.
- Sharpness: Adjusts detail clarity of image.
- Gamma: Controls luminance curve balance.
- Gain: Adjusts brightness by shifting pixel values.
Exposure: Simulates camera exposure adjustments.
Start Training:
- Once configured, click Train to begin model training.
Evaluate the Model
After training, you can analyze model performance using visual feedback.
Training Performance Graph Overview:
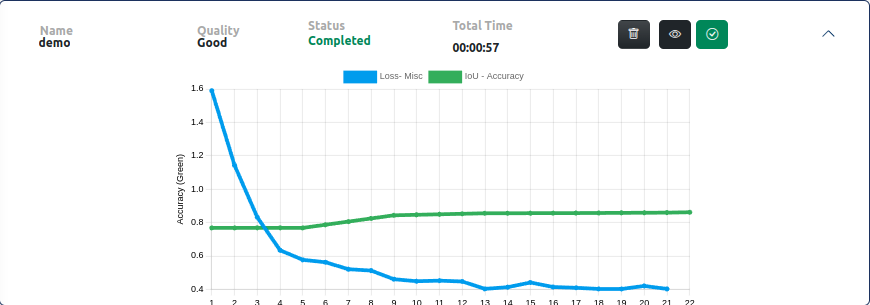
- X-Axis: Iterations or training time.
Y-Axis:
- Left – Loss (blue line): Lower loss is better.
- Right – Accuracy/IoU (green line): Higher IoU = better segmentation accuracy.
Graph Elements: Blue Line (Loss), Green Line (Accuracy/IoU).
- Legend: Loss - Misc (Blue), IoU - Accuracy (Green).
Data Statistics Panel (Right Panel)
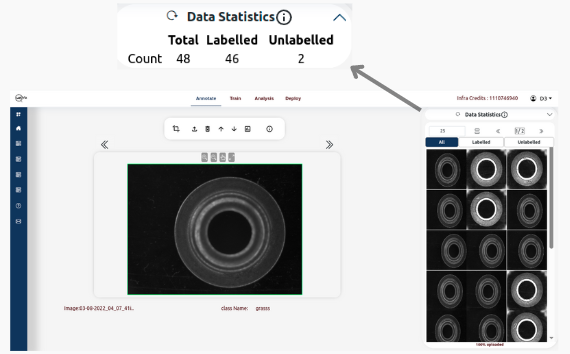
Tabs Available:
- Total: Total images in the dataset.
- Labelled: Annotated images.
- Unlabelled: Images pending annotation.
Functionalities on the Panel:
- Reset Button: Refresh stats for current image groups.
- Information Icon: Tutorial link for help.
Training Details Section
- Name: Unique ID (e.g., srp082)
- Quality: Example: “Fair”
- Status: Completed
- Total Time: 00:03:00
- Actions: Delete, View Training Info
Usage
- Monitor Training Progress: Ensure accuracy improves and loss decreases.
- Identify Overfitting: Check if performance stagnates or worsens.
- Optimize Hyperparameters: Use comparisons to refine training settings.
These tools help improve segmentation model performance through structured training and monitoring.