Annotate Page for detection
The label page on Qualviz.ai provides tools and features for annotating and managing your dataset effectively. Below is a detailed guide to its functionalities.
Introduction
Use the built-in annotation tools on Qualviz.ai to create bounding boxes around objects for object detection model training. If your dataset already includes detection labels, ensure they are in a compatible format before proceeding.
Annotation Toolbar (Left Panel)
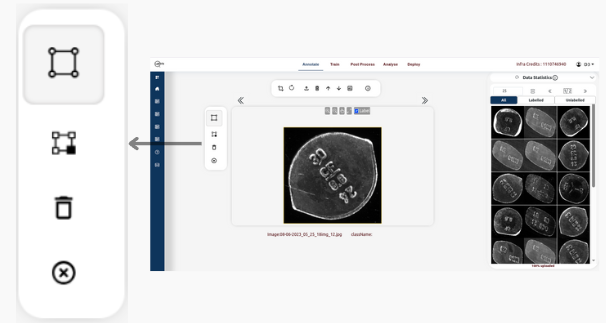
Rectangle
- Draw bounding boxes around objects in the image to annotate them for detection.
Edit Selected
- Modify the size or position of a selected bounding box to correct or adjust the annotation.
Delete Selected
- Remove the currently selected bounding box from the image.
Clear Annotations
- Delete all bounding boxes on the current image to start fresh.
Image Display and Controls (Center Section)
The central image viewer provides an interactive canvas for image annotation with several tools for easy navigation and zooming.

Image Controls:
- Zoom In/Out: Magnify or reduce the image for precise labeling.
- Pan: Move the image within the viewer.
- Reset: Restore the image to its original position and zoom level.
- Label: Select or change the class name assigned to each bounding box before or after drawing it on the image.
Image Information:
- Image Name: Displays the current image being annotated (e.g., cropped10.jpg).
- Class Name: Shows the current annotation class.
Top Panel (Preprocessing and Dataset Management)
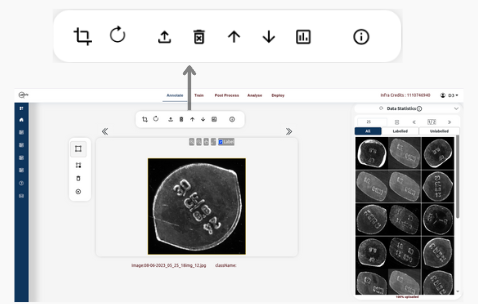
ROI (Region of Interest):
- Define specific regions of interest within images for focused annotation or analysis.
- Helps in segmenting specific areas for tasks like object detection or classification.
Reset ROI:
- Remove the current selection and revert the ROI to its original setting.
Import Images:
- Import additional images to your dataset easily if needed.
- Supports various image formats like JPG, PNG, etc.
Delete Images:
- Remove unwanted images from your dataset to keep it clean and focused.
Use Datasets:
- Utilize pre-existing datasets or create new ones based on your requirements.
Download Dataset :
- Save all annotated images and labels to your computer.
Generate Report
- Create a summary of annotations, model performance, and other relevant metrics in a downloadable format.
Tutorial On detection :
- This tab provides step-by-step guides on labeling images, training detection models, and analyzing results within Qualviz.
Data Statistics Panel (Right Panel)
The right-side Data Statistics Panel provides a summary of the current dataset and options to manage images as labelled and unlabelled.

Tabs Available:
- Total: The complete number of images in the current dataset.
- Labelled: The number of images that have been annotated with labels.
- Unlabelled: The number of images that have not yet been annotated.
Functionalities on the Panel:
- Reset Button: Resets the Data Statistics based upon the changes in all,labeled and unlabeled sets.
- Information Icon: Guides to the tutorial on data viewer.
Key Functionalities on the Label Page – Detection:
Annotation Management: Draw and manage bounding boxes to mark objects with precise size and position.
Image Navigation: Use zoom, pan, and reset tools for better control and detailed annotations.
Preprocessing Options: Apply filters or enhancements to improve image clarity before labeling.
Class Label Selection: Choose or edit object classes before or after creating bounding boxes.
Best Practices for Detection Annotation
- Maintain consistent object class names, ensure bounding boxes tightly enclose the target, avoid overlaps unless intentional, and perform periodic reviews for annotation quality and accuracy.
Use Cases
Object detection for machine learning, defect localization in manufacturing, counting and tracking of components, and bounding box annotation for automated visual inspection systems.
Final Step
Once your annotations are complete, save the changes to proceed with model training